Moving day is a chaotic blend of exhaustion and adrenaline. You’ve yanked the hooks off the plaster. You’ve boxed up your life. You even took the time to patch those small nail holes from the previous tenant’s art collection. You’re ready to hand over the keys. But there is one lingering anxiety keeping you awake: the security deposit.
Specifically, the anxiety of removing those stubborn Molly bolts.
If you are renting, leaving behind a wall riddled with oversized holes or chunks of missing drywall is a surefire way to lose your deposit. And if you are a homeowner who previously installed heavy shelving, you know that pulling out a toggle bolt or a Molly anchor usually results in a patch job that looks worse than the hole itself.
Most guides tell you to cut away the drywall. That’s lazy advice. You can remove these anchors cleanly, preserving the wall’s integrity and your peace of mind. Here is how to do it without turning your living room into a construction zone.
What Exactly Is a Molly Bolt?
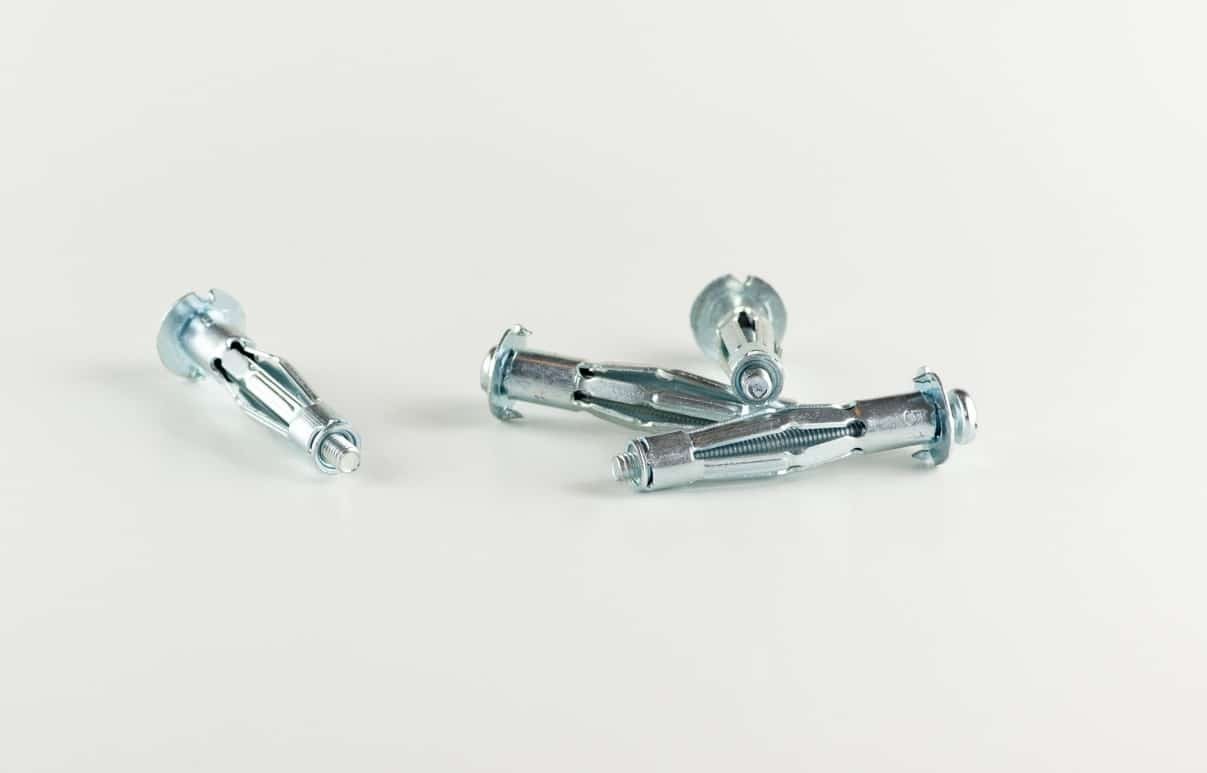
Before you start swinging a hammer or wielding a saw, you need to understand what you are dealing with. A Molly bolt is a type of metal drywall anchor. It consists of a hollow, expandable metal sleeve and a screw.
When you drive the screw in, the sleeve compresses. Once it’s through the drywall, the sleeve expands behind the wall, gripping the backside of the plasterboard. This creates a strong hold for heavy items like TVs, shelves, or bathroom vanities.
The problem? The anchor is designed to stay put. Pulling the screw out doesn’t release the grip. The flanges on the back of the wall remain trapped inside the cavity. If you just yank on the screw, you might pull the entire anchor out, but you’ll likely tear a massive hole in the drywall as the flanges drag through the paper facing.
You need to release that grip. You need to collapse the anchor back into a shape small enough to slip out without damaging the surface.
The Screw Removal Method: For Small Bolts
If your Molly bolt is relatively small and hasn’t been corroded or stripped, you might be able to simply unscrew the hardware. This is the least invasive approach.
Grab a screwdriver that fits the screw head perfectly. A Phillips head is common, but some older installations use slotted screws. If it’s stripped, use a rubber band between the screw and the screwdriver head to gain traction.
Turn counter-clockwise. Slowly. Watch the wall.
If the anchor holds firm and the drywall starts to crack around the screw hole, stop. Do not force it. You will tear the paper. Instead, you will need to move to the next method.
The Wire Trick: Collapsing the Anchor
This is the most reliable method for removing Molly bolts without creating a giant hole. The goal here is to compress the metal sleeve so the flanges collapse inward.
You need a thin, stiff piece of wire. A straightened coat hanger works well. Alternatively, you can use a small screwdriver or a specialized anchor removal tool if you have one.
- Remove the Screw: Take the screw completely out of the anchor. You will be left with just the metal sleeve stuck in
You’re looking at a hole in your wall. It’s from that heavy mirror you finally took down, or maybe the shelving unit that served its purpose. The anchor inside isn’t just a piece of plastic. It’s a Molly bolt—a metal expansion anchor designed to hold serious weight. They are fantastic when you need to mount a TV or secure a cabinet to prevent tipping. They grip deep inside plaster, hollow brick, or drywall.
But they are notoriously difficult to remove.
The design relies on expansion. When you tighten the screw, the metal sleeve expands behind the wall surface. This creates a mechanical lock. Pulling on it directly often rips the drywall paper right off the gypsum. You don’t want that mess. You want the wall smooth and ready for paint.
Here is how you get those anchors out with minimal damage.
The Screwdriver Method (Least Destructive)
This is the standard approach. You don’t need power tools. You just need patience and the right hand tools.
What you need:
* Phillips head screwdriver
* Flathead screwdriver
* Pliers (needle-nose work best)
* Spackling compound
* Paint
The steps:
- Remove the screw. Use the Phillips head to unscrew the bolt completely. It should come out easily. The anchor stays in the wall.
- Locate the collar. You’ll see a small metal flange sitting flush against the drywall surface. This is the part holding it all together.
- Pry the collar. Slide the tip of your flathead screwdriver under the edge of the metal collar. You are trying to slip it between the metal and the drywall surface.
- Break the bond. Gently lever upwards. You are trying to snap the thin metal leg of the anchor or detach the collar from the main body. Do not force it aggressively. You risk tearing the drywall paper. If it resists, wiggle it.
- Remove the flap. Once the collar is loose, grab it with your pliers and pull it away. It should come off in one piece.
- Push the rest in. The remaining body of the Molly bolt is now free from the surface tension. Push it back into the cavity of the wall. It doesn’t matter if it’s stuck inside the hollow space.
- Patch and paint. Fill the hole with spackling compound. Smooth it out. Let it dry. Sand it lightly. Paint over it.
Key Insight: The goal here is to detach the surface anchor from the wall, not to extract the entire metal object. Pushing the remainder into the wall cavity is safer than pulling it out.
The Drill Method (Fastest)
If you have a drill, this method is quicker. It breaks the mechanical grip entirely.
What you need:
* Drill with a metal-cutting bit
* Phillips screwdriver
* Pliers
The steps:
- Unscrew the bolt. Just like before, remove the screw first.
- Choose your bit. You need a metal drill bit that is slightly larger than the Molly bolt’s outer diameter.
- Drill through the center. Position the drill bit on the center of the anchor. Drill straight through the metal sleeve. You are not trying to drill into the wall; you are trying to slice the metal anchor in half.
- Remove the collar. The structural integrity of the anchor is now gone. Use your pliers to grab the remaining metal flange and pull it off the surface.
- Push the fragments in. The pieces left inside the wall are irrelevant. Push them deeper into the cavity if they are near the surface.
- Patch and paint. Standard spackling procedure follows.
The Hammer Method (Risky but Effective)
This is for the impatient. It works, but it carries a higher risk of damaging the drywall surface if your aim is off.
What you need:
* Hammer
* Screwdriver (optional, for loosening)
The steps:
- Loosen the screw. Do not remove it completely. Just back it out until the head of the screw is exposed and protruding slightly from the anchor body.
- Strike the screw head. Hit the protruding screw head with the hammer. The impact transfers force down the shaft.
- Shear the anchor. The goal is to break the connection between the screw and the expanding legs of the Molly bolt. You want the screw to pull out of the anchor body, leaving the anchor’s legs detached from the tension.
- Remove the collar. Once the screw is out, the collar should be loose enough to remove with pliers or even your fingers.
- Push the body in. Shove the remaining metal piece into the wall.
- Patch and paint.
Warning: If you hit too hard, you dent the drywall. You’ll end up with a dimple that requires more spackle. Aim for precision.
When You Can’t Get It Out
Sometimes the anchor is rusted. Sometimes the drywall crumbles. Sometimes you just give up.
If you cannot remove the collar, do not force it.
- Break it off. Use the hammer method to shear the anchor body away from the surface.
- Push it in. Ensure no sharp metal edges are poking out.
- Use acrylic caulk or spackle. Fill the hole.
- Paint over it.
It won’t be perfect. There might be a slight texture difference. But for most homeowners, a patched hole is better than a hole with a metal anchor stuck in it.
Why Molly Bolts Are Worth the Hassle
You might wonder why we use them if they are such a pain to remove. The answer is weight capacity.
Standard plastic anchors fail under heavy loads. Molly bolts distribute weight across a larger area behind the drywall. An 8mm Molly bolt can hold 25 kg. An 11mm one holds 40 kg. A 13mm version supports up to 50 kg.
They are essential for:
* Large mirrors
* TV mounts
* Heavy shelving units
* Cabinet security (preventing tip-overs)
* Chandeliers
The installation is easy. The removal is the penalty for using such a robust fixing method.
Final Thoughts on Wall Repair
After you’ve pushed the anchor in and patched the hole, let the compound dry completely. Rushing this step leads to cracking. Sand it smooth. Apply a primer if you are painting a new color. Top with your finish coat.
The wall will look new. The anchor will be hidden deep inside the wall structure, where it belongs. You’ve successfully upgraded your wall without leaving a trace of the hardware that held everything up.
Now, what are you hanging next?


