


There is nothing quite like the smell of fresh brew to jolt you awake. Conversely, staring at a coffee maker that refuses to brew is a special kind of morning torture.
Before you toss the machine or drag it to a repair shop, pause. Most issues are minor. You likely have the tools in your junk drawer to fix it. Understanding the mechanics helps. It turns a frustrating appliance into a simple puzzle.
The Mechanics of Morning Caffeine
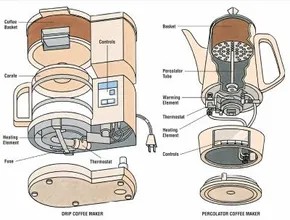
Not all machines work the same way. You generally have two options: drip or percolate.
Drip machines are the standard. You flip a switch. A heating element boils water. Pressure pushes the water up a tube. It drops through coffee grounds in a basket. The liquid falls into a carafe below. A warming plate keeps the pot hot until you pour the second cup.
Percolators are older tech. They recycle water. Water in the base heats up. Steam pressure forces the water up a central tube. It showers over the grounds. The brewed coffee drips back down into the base. This cycle repeats. A thermostat monitors the temperature. Once it hits the sweet spot, the system cuts power to the heating coil.
Knowing which type you own dictates your repair strategy. The components differ. The failure points vary.
Troubleshooting Common Failures
When a machine stops working, the culprit is usually one of four parts: the on/off switch, the thermostat, the heating element, or the warming element.
Start with the basics. Is it plugged in? Is the breaker tripped? If power is reaching the unit but nothing happens, the issue is internal.
How to Test and Replace an On/Off Switch
The switch is the gatekeeper. It controls current to the heater and the pump. When it fails, the machine is dead. Fortunately, these switches are simple. They are easy to test. They are easy to replace.
Follow these steps carefully. Safety first.
Step 1: Unplug the coffee maker. Always. Working with live electricity inside a plastic casing is a recipe for shock.
Step 2: Remove the base or outer shell. You need access to the back of the switch. This might require Phillips or flathead screwdrivers. Keep your screws organized. They are not interchangeable.
Step 3: Locate the terminals on the switch. Place multimeter probes across them. Flip the switch on.
You are looking for continuity. The circuit should close. The meter should beep or show zero resistance. If there is no continuity when the switch is on, the switch is dead. Replace it.
This continuity test applies to other controllers too. Timers often act as switches. They conduct electricity in certain settings and block it in others. If your timer won’t advance, test it the same way.
How to Check a Drip Coffee Maker Thermostat
The thermostat regulates heat. It tells the heating element when to stop and start. If it fails, you might get cold coffee or burnt grounds. Or nothing at all.
Testing it requires disassembly.
Step 1: Unplug the unit. Empty any remaining water from the reservoir. Turn the machine upside down. Remove the base screws. You might need special head screwdrivers for certain models. Larger hardware stores carry these. They are worth the trip.
Step 2: Locate the thermostat. It is usually mounted near the heating element. Use a continuity tester or multitester. Place a probe at each end of the thermostat terminals.
Check the reading. The thermostat should show continuity when cool. If it reads open circuit when cold, it is faulty.
A multimeter is your best friend here. It turns guesswork into data.
If the thermostat tests fine, the problem might lie elsewhere. The heating element could be burned out. The wiring could be frayed. But start with the thermostat. It is a common point of failure.
The Tools You Actually Need
You don’t need a workshop. Just a few basics.
- Multimeter: Essential for testing continuity and voltage.
- Screwdriver Set: Include precision bits for small screws.
- Needle-nose Pliers: Helpful for gripping small terminals.
- Work Gloves: Protect your hands from sharp edges inside the casing.
Safety First
Electricity and water do not mix. Even when unplugged, capacitors can hold a charge. Wait a few minutes after unplugging before touching internal components. Do not submerge any part of the machine in water. Clean the exterior with a damp cloth only.
If you smell burning plastic or see scorch marks, stop. The damage
You’ve traced the power. Now you need to fix the broken link.
Checking the Thermostat
If the unit failed continuity, the thermostat is dead. Swap it out. Match the rating exactly. Don’t guess.
This applies to drip models and percolators alike, though the physical layout differs. The function is identical: regulate heat.
For Percolators:
Unplug the machine. Dump the grounds. Flip it over. Remove the base plate to expose the guts. You’re looking for the thermostat and heating coil.
Test continuity across the terminals. If the multimeter reads infinite resistance (open circuit), the thermostat is fried.
Here is the catch. Some percolator thermostats are riveted or soldered in place. Unscrewing isn’t an option.
Do you have the tools for desoldering? Probably not.
If the repair requires brute force or high heat, stop. Take it to a pro. Or replace the whole machine. The parts cost is likely higher than the labor risk.
Replacing the Heating Element
Cold coffee is a tragedy. The heating element is the culprit. It sits at the base.
Access it by removing the bottom panel. Empty all liquids first. Water and electronics don’t mix.
Test the element like any wire. Disconnect power. Place probes on each terminal.
Does it conduct? If yes, the element is fine. Move on.
If no current flows, the element is broken. Replace the assembly.
Mark wire locations with masking tape before you disconnect anything. Labeling saves headaches. Reassembly without notes is a guessing game.
The Warming Plate
Brewing is over. Now the warming plate kicks in. It keeps coffee hot for hours.
Sometimes it runs all day. Heat fatigue sets in. It fails.
Spills cause shorts too. Coffee seeps into the base. The warming element shorts out.
Test it similarly. Remove the base. Locate the warming plate. Disconnect the terminals.
Check continuity. Open circuit? Replace it.
This is often the first thing to break. Why? Because it’s always on. And it’s always exposed to potential spills.
The Next Step
Coffee makers are mostly straightforward. One broken part stops the whole show.
But what about the motor-driven appliances?
Food mixers are next. They have brushes. They have gears. They are different beasts.
Let’s move there.