



Forget the spare bedroom. That’s a trap.
You might think converting a guest room into a cinema is the obvious move. It’s empty. It has walls. Easy, right?
Wrong.
Most bedrooms are too small. They’re awkwardly shaped. And they sit next to bedrooms where sleep actually happens. If you blast a high-speed car chase through the night, you aren’t building a dream factory. You’re building a reason for your family to hate you.
Converting a sleeping space into a functional home theater is a heavy lift. You aren’t just stacking TVs. You’re fighting physics. You need to optimize sound. Block light. Deliver clean power. Dampen volume so the neighbors don’t call the cops. Then, you need seating that doesn’t kill your back.
Let’s get practical. Here is how to actually pull this off without losing your mind or your wallet.
Picking the Right Room for Your Setup
Start with the layout. If you care about acoustics—and you should—choose a simple rectangle.
Skip the rooms with bump-outs. Ignore spaces with exposed pipes, heat registers, or built-in shelving that sticks out. Every protrusion scatters sound waves in the wrong direction. You want flat planes. Few openings. Minimal complexity.
If the room you have is a nightmare of nooks and crannies, you can fix it later. But starting with a clean box makes the work significantly easier.
Calculating Viewing Distance and Screen Size
This is where most DIYers fail.
They buy a massive screen. They sit two feet from it. They end up seeing pixels instead of movies.
Video-equipment manufacturers have a rule for this: Home theater seating should be at least twice the width of the screen.
Let’s do the math.
If your screen is 60 inches wide, you need to sit roughly 10 feet away.
If your screen is 80 inches wide, you need roughly 13-14 feet.
Why? Because if you sit too close, your brain can’t process the whole image at once. You see the build-up structure. The dots. The grid. It ruins the immersion.
If your bedroom is small, you have a hard choice to make. Do you shrink the screen? Or do you accept a compromised experience? Don’t blow off this recommendation because “bigger is better.” In a small room, bigger just means worse.
Essential Considerations for Your Build
Before you drill a single hole, answer these questions. Your answers dictate your budget and your headache level.
What is the room’s primary purpose?
Is it for movies only? Or are you also playing video games and listening to music? More components mean more space. More power drain. More compatibility headaches. A dedicated media room is simpler. A multi-purpose den is a project.
How many people are watching?
You need a minimum 30-degree viewing angle for the outer seats. If you want rows of seating, check the room depth. Small bedrooms rarely accommodate more than one or two rows comfortably.
What is your soundproofing budget?
You have two main paths:
1. Acoustic panels or wall tiles. Cheaper. Easier. They treat reverb but don’t stop sound from leaking out.
2. Sound dampening material behind the walls. More involved. More expensive. Far more effective at keeping the noise inside.
Do you want automation?
Dimming lights. Closing blinds. Powering on the projector with one button. It’s slick. It’s expensive. But it elevates the experience from “watching a movie” to “going to the theater.” If you want that slick feel, you’ll need smart home integration or motorized shades.
Is the electrical service adequate?
This is critical. Don’t plug your AV receiver, subwoofer, projector, and lights into the same circuit as the kitchen. You will trip breakers. You will have voltage drops. Call an electrician. If you plan to mount heavy equipment on the ceiling or wall, you need a heavy-duty electrical box. Do not skimp here. A loose mount with a $3,000 projector is a recipe for disaster.
Designing the Look: Cables vs. Clean Lines
How you hide the tech matters.
If you’re a tinkerer who likes to tweak settings and swap cables, you might not mind the mess. You need easy access to the back of your components. Keep the gear exposed. Keep the cables visible but organized.
But if you want a showplace—a room that looks like it belongs in a magazine—you need to hide the hardware.
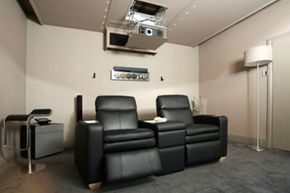
Consider building a wall of shelving. Or better yet, a false wall. This makes the screen look built-in. It hides the wiring. It creates a clean, immersive look that doesn’t distract from the movie.
It takes more work. It costs more. But the result is a space that feels intentional. Not just a bedroom with a TV taped to the wall.
You’ve got the popcorn machine. You’ve got the chairs. Now you need the space to match the ambition. Start with the room. Nail the layout. Get the distance right. Everything else is just detail.
But what about the sound? That’s a whole other beast. And we aren’t done yet.
Don’t Hide the Mess Until It Works
You are going to make mistakes. That is not a possibility, it is a guarantee. The biggest error people make with bedroom theater builds is rushing the cosmetic phase. You want to run cables behind drywall or tuck wires into molding before you know if the signal actually works. Don’t do that.
Test everything while it is exposed. If the HDMI handshake fails, you need to see the cables to fix it. Once you tuck them away, you are blind. Treat this like a process, not a sprint.
Prep Work Saves Sanity
Start by taking an inventory. Nothing kills momentum like realizing you are missing a specific HDMI cable or that the remote needs AAA batteries you don’t have on hand. Gather the manuals for every component now. Read them. Specifically, look for power requirements and port locations.
Label your cables as you go. If you have a tangle of cords, use tape and a marker. Write what is on each end. This is your lifeline for future troubleshooting. Draw a simple diagram of the connections. Note any settings you change or fixes you apply. Save this info. You will thank yourself in six months when a pixel disappears.
Cord Management and Safety
Cords under carpet are a tripping hazard and a fire risk. Never run cables across entryways or aisles. If you can, tape them along the baseboard. It looks cleaner and keeps them safe.
If you must cross a room, use a low-profile cable cover. These are cheap and effective. They protect the wire from floor vacuums and keep your family from stumbling. Safety first, aesthetics second.
Build Up, Then Decorate
Get the electronics running before you buy a single throw pillow. If you are working on hardwood, put down cardboard or a drop cloth. Scratches on your floor are permanent. Scratches on your screen are worse.
Consider the acoustics. Hard surfaces reflect sound and create echoes. A rug helps dampen the room. It improves audio clarity more than you think. Get the system up and running in its final location before you add furniture. You need to know the viewing angle and distance are correct.
Plan for the Upgrade Cycle
Your setup will not be perfect. And in six months, you will want something new. A bigger screen? Better speakers? Make sure you have the space and power outlets to accommodate future gear. If you build a rigid structure now, you will have to tear it down later.
Keep the design flexible. Leave room for growth. Ensure you have accessible power sources near the TV stand and soundbar. Don’t box yourself in.
Quality Over Splurging
Your theater is only as good as its weakest link. It is tempting to buy a $2,000 TV and pair it with $50 speakers. The mismatch will hurt your experience. The TV will look amazing, but the audio will muddy the detail.
Strike a balance. Buy components of similar quality. It is better to have a solid, balanced system than a lopsided one. Curb your enthusiasm for the “must-have” feature that drains your budget. Stick to a list.
Think About Resale Value
You are converting a bedroom. Keep that in mind. When you sell the house, a massive structural retrofit might be a turnoff. You don’t want to undo drywall or special wiring just to get buyers to look past the theater.
Keep upgrades sensible and generic. Use standard mounting hardware. Avoid permanent modifications that can’t be easily reversed. This protects your investment in the home itself.
Watch the Budget
Home theater in a box (HTIB) systems are convenient. They include everything but the TV. Built-your-own systems offer more control but more cost. Wireless speakers are nice, but they add up. Disc changers are rare now, but if you go digital, check your streaming device compatibility.
Make a list of essentials. Stick to it. Extras like fancy remotes or decorative stands are not essential. They are where budgets die. Know what you can live without.
A Bit of History
3D isn’t new. We associate it with modern blockbusters like Avatar, but the tech goes back to the 1840s. Sir David Brewster, a Scottish physicist, invented the stereoscope. It created the illusion of depth long before Hollywood made it a marketing gimmick. The basic principle remains the same. Depth perception through dual images.
Final Thoughts on the Build
This is part of a larger journey. The installation is just the start. Calibration matters. Color accuracy and sound levels need fine-tuning. Don’t skip the setup menu options. They exist for a reason.
Your bedroom theater is a sanctuary. Build it with care. Test it with patience. Enjoy the result.