

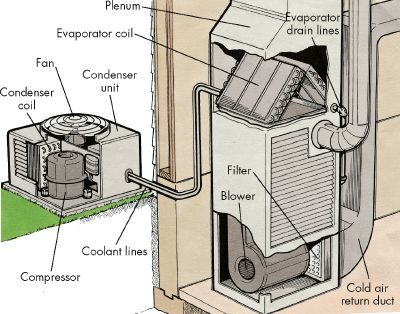
Central air is not a single unit. It is a split system. You have an outside piece and an inside piece. The condenser sits on a concrete slab outdoors. It dumps heat. The evaporator coil lives inside. It is mounted in the plenum above your furnace.
They work together. But they are distinct. Understanding this split is key to why central AC runs but house doesn’t cool.
Most homes use a forced-air system for both heat and cold. The blower motor does the heavy lifting. It pushes air through the same ductwork. You don’t need separate pipes for cooling. Just air moving through tubes.
Here is the flow. Hot indoor air gets pulled back. It travels through return-air ducts. It hits the furnace. The blower pushes it across the chilled evaporator coil. The air drops in temperature. Then the ducts deliver that chill to your rooms.
So where is the breakdown?
If the unit is on. The fan is moving. But the rooms stay hot. The issue is rarely the cooling itself. It is the distribution. The air never reaches you. The problem lies in the ducts. Or the blower. Or the connections between them.
Your central air system is split into two main sealed components. The condenser sits outside on that concrete slab. The evaporator coil lives above your furnace inside the house.
Because both units are sealed systems, you cannot just pop them open and tinker. You need a pro for almost anything beyond basic cleaning. Have the system inspected before every cooling season. Don’t stop there though. Annual checks are good. Daily maintenance keeps it running at peak efficiency.
Caution: Turn off the power to both the condenser and the evaporator assembly before touching anything.
DIY Troubleshooting Basics
Most major repairs require a certified technician. You can, however, fix minor issues yourself. Look at your specific problem.
Condenser won’t start?
Check your main breaker panel. A blown fuse or tripped circuit breaker is the usual suspect. Restore the circuit. Also, check your thermostat. If it’s set too high, the unit won’t kick on. Lower it by 5 degrees. If it still doesn’t run, the motor or compressor is likely faulty. Call a pro.
Uneven or inadequate cooling?
First, lower the thermostat setting by 5 degrees. If that doesn’t work, check the filters and coils. A dirty evaporator or condenser can choke airflow. Clean the coils. Straighten any bent fins on the condenser. Remove weeds or debris blocking the outdoor unit. If the unit is still too small for the space, you’ll need a larger unit. That’s a pro job.
Condenser short-cycling?
If it turns on and off repeatedly, it’s probably overheating. Clean the condenser coil and fins. Clear out any grass or vines blocking airflow. A dirty evaporator can cause this too. Clean it.
How to Clean the Evaporator Coil
A dirty evaporator is a common culprit for poor cooling. It’s located in the plenum above the furnace.
You might not be able to reach it. If the plenum has foil-wrapped insulation, you can clean it. If it’s a sealed sheet metal box, leave it alone. Do not open a sealed box.
Here is how to access and clean an accessible evaporator.
Step 1: Access the Unit
Remove the foil-wrapped insulation at the front of the plenum. It’s likely taped in place. Peel the tape off carefully. You’ll need to replace it later. Behind the insulation is an access plate. It’s held by several screws. Remove the screws and lift the plate off.
Step 2: Clean the Evaporator
Use a stiff brush to clean the entire underside of the evaporator unit. A large hand mirror helps you see what you’re doing. If you can’t reach the back, slide the evaporator out a little. It can slide out even with rigid pipes attached. Be careful not to bend the pipes.
Step 3: Handle the Condensate Tray
Clean the tray below the evaporator. This tray carries condensation away from the unit. Pour one tablespoon of household bleach into the weep hole in the tray. This prevents fungus growth.
In extremely humid weather, check the drain and pan every other day. If there’s much moisture in the pan, the weep hole to the drain line may be clogged. Use a piece of wire to open it.
Step 4: Reassemble
Put the unit back into place. Reinstall the access plate. Tape the insulation back over it.
Step 5: Final Check
Turn the air conditioner back on. Check for air leaks. Seal any leaks with duct tape.
Once the inside is clean, you’ll likely need to address the outside unit next. The condenser gets dirty too.
Clearing Debris from the Outdoor Unit
Your condenser unit takes a beating. It sits outside. It collects dust. It catches leaves. Lawn clippings and tree sap clog the coils. This blocks airflow. The fan can’t move air across the coil efficiently. You need to clean the intake side.
Check airflow direction first. Turn off the power. Look at the fan. See where it pulls air.
Start with vegetation. Cut back grass. Remove vines. Weeds choke the unit. They restrict air. Clear the area around the base.
Next, tackle the coils. Use commercial coil cleaner. You can find it at refrigerator supply stores. Follow the instructions on the bottle. Flush the coil. Do not use a garden hose to blast it clean. Water alone doesn’t cut through the grime well enough. Let it dry completely before moving on.
The fins are tricky. They are made of light-gauge aluminum. Bend one, and it’s ruined. Use a soft brush. Remove dirt gently. You might need to remove the protective grille to reach them. Never spray water on the fins. Water turns dirt into mud. The mud packs between the fins. It blocks airflow permanently.
If fins are bent, fix them. Use a fin comb. Appliance parts stores sell them. The comb slides between the fins. Straighten them carefully. One wrong move breaks them.
Check the pad. The unit rests on concrete. It needs to be level. Put a carpenter’s level on top. Check front to back. Check side to side. If the pad has settled, the unit tilts. Lift it with a pry bar or a 2×4. Force gravel or rocks underneath. Level it out. Uneven units vibrate more. They wear out faster.
Protect it in winter. Leaves fall. Ice forms. Blockages happen. Use a commercial cover. It fits the shape. Or use heavy plastic sheeting. Secure it with sturdy cord. Keep the elements out.
Checking the Refrigerant Lines
If you cleaned everything. The air is still warm. The problem might be refrigerant. Most systems use Freon. Or a modern equivalent.
If the system is low on coolant. It won’t cool. Little or no cooling happens. The fix isn’t DIY.
Don’t try to charge the lines yourself. Call a professional service person. They have the tools. They have the certification. Charging refrigerant is dangerous. It requires specific equipment. Leave it to the experts.
You can do one thing yourself though. Check the lines. Look at the pipes running from the condenser to the evaporator inside. The insulation might be damaged. It might be worn.
Damaged insulation cuts efficiency. Heat enters the line. The system works harder. Replace it. Use new insulation of the same type. Follow manufacturer instructions. Do it soon.
Now you know what you can fix. And what you can’t. You can save money on maintenance. You can get cool air sooner. But don’t overreach. Some jobs belong in professional hands.