


Як зробити настільну лампу з пічної труби своїми руками
Самостійне виготовлення лампи коштує дешевше, ніж купівля готової. До того ж, вона виглядає краще. Вам не доведеться задовольнятися безликим товаром масового виробництва із великого магазину. Натомість ви отримуєте саме те, що хочете.
У цьому конкретному проекті використовуються пічна труба та фанера. Це індустріальний стиль. Це міцна конструкція. І, що дивно, побудувати її досить легко, якщо у вас базовий набір інструментів.
Чому варто будувати так? Тому що металеві труби чудово служать несучими колонами. Фанера забезпечує міцну основу. Разом вони створюють лампу, яка не перекинеться, якщо ви випадково зачепите її.
Як корпус лампи можна використовувати практично будь-яку ємність. Підійдуть пляшки з-під вина, банки з різьбленням, кошики. Але в цьому посібнику основна увага приділяється методу з пічною трубою. Він виглядає обережніше. Більш сучасно. Менше схоже на виріб з ярмарку ремісників і більше — на роботу дизайн-студії.
Які матеріали потрібні для лампи з пічної труби?
Чи не ускладнюйте. Вам не потрібні екзотичні породи дерева чи спеціалізований інструмент для роботи з металом. Ось що вам справді знадобиться:
- Фанера : Нарізана на диски. Один для основи. Один для верхньої частини (куди кріпиться патрон).
- Пічна труба : Оцинкована сталева труба. Що використовується для димоходів або вентиляції. Вона коштує недорого у будівельних магазинах.
- Ламповий патрон : Стандартний патрон із цоколем середнього розміру.
- Вимикач лампи : Вбудований вимикач на дроті простіше в установці, ніж провідний.
- Шнур для лампи : Стандартний двожильний шнур.
- Будівельний клей : Щоб прикріпити дерево до металу.
- Грунтовка та глянсова емаль : Для фінішної обробки.
- Штепсельна вилка зі швидким затискачем : Щоб ви могли вмикати та вимикати лампу з розетки, як звичайну лампу.
Як вирізати і підігнати фанерну основу
Почніть із нижньої частини. Виміряйте внутрішній діаметр вашої труби. Виріжте фанерний диск, який щільно входить усередину. Він не повинен бовтатися. Але й не повинен бути настільки тугим, щоб тріснути трубу.
Висвердліть отвір у центрі. Воно призначене для шнура лампи.
Тепер виріжте другий диск для верхньої частини. У ньому потрібно два отвори:
1. Одне для виходу шнура.
2. Одне кріплення лампового патрона.
Вставте нижній диск у пічну трубу. Закріпіть його за допомогою будівельного клею. Тримайте на місці, поки клей не застигне. Це ваша основа.
Підключення проводів лампи з пічної труби
На цьому етапі люди часто нервують. електрика. Але все просто, якщо дотримуватися правил.
Спершу пропустіть шнур лампи через нижній диск. Потім нагору через пічну трубу. Потім крізь верхній диск.
Прикріпіть ламповий патрон до верхнього диска. Затягніть гвинти. Переконайтеся, що дроти правильно зачищені. Підключіть чорний дріт до контакту з латунями. Підключіть білий провід до срібного контакту. Закріпіть провід заземлення, якщо він є.
Завжди вимикайте живлення на автоматичному вимикачі перед роботою. Навіть якщо ви просто збираєте лампу, належите до напруги з повагою.
Встановіть вбудований вимикач на шнур. Це дозволяє вмикати та вимикати світло, не вдаючись до настінного вимикача. Це зручно. Це розумно.
Як обробити і пофарбувати лампу
Необроблений метал та дерево виглядають незавершеними. Для зразка це нормально. Але не для вашої спальні.
Як зробити настільну лампу з пічної труби
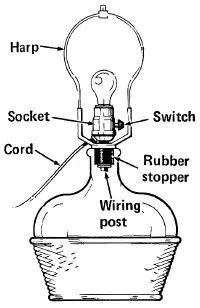
Для елегантного вигляду не потрібна дорога фурнітура. Стандартний комплект для складання лампи та абажур можуть перетворити практично будь-яку велику ємність на настільну лампу на замовлення. Це дешево. Це швидко. І це позбавляє вас від покупки завищеної за ціною декоративної продукції.
Візьміть плоскогубці, викрутку та, можливо, дриль. Знайдіть основу – товсту пляшку з-під вина, плетений кошик, молочне відро або навіть керамічний глечик. Форма має менше значення, ніж вага. Лампа без обтяження становить небезпеку. Якщо ваша основа непрозора, наповніть її піском, цеглою або свинцевими вантажами. Прозорі ємності дозволяють виявити креативність. Шарами насипте пісок, сушені боби, мушлі або навіть сірникові коробки. Головне – переконайтеся, що конструкція не зрушується, коли ви випадково задаєте стіл.
Вибрана ємність визначає спосіб прокладання проводки. Суцільні підстави прості у роботі. Купуйте комплект для перетворення в електричну свічку з вилкою. Такі комплекти вставляють прямо у верхній отвір. Свердління не потрібне. Кабель виходить зверху, прихований вузлом патрона.
Порожнисті підстави, такі як плетені кошики, потребують іншого підходу. Вам знадобляться окремі компоненти: патрон, шнур, вилка на затиску, різьбова порожниста стрижень, латунна гільза і тримач абажура. Стрижень має бути такою висоти, якою ви хочете зробити лампу. Шнур проходить крізь стрижень до нижнього краю. Це означає, що потрібно просвердлити отвір у підставі.
Якщо ви використовуєте комплект з вилкою для суцільної основи, спершу обважніть його. Потім зберіть пост для проведення. У комплекті йдуть гумові пробки різних розмірів. Знайдіть ту, що щільно підходить до отвору вашої ємності. Вверніть наконечник посту для проведення в корок. Затягніть його. Прикрутіть латунну шайбу та контргайку до нижньої частини стрижня. Прикріпіть патрон до верхньої частини. Вставте складання у обтяжену ємність. Щільно натисніть на корок. Проведення готове.
Далі додайте абажур. Виберіть той, який поєднуватиметься з основою. Прикрутіть утримувач абажура до основи патрона. Зніміть контргайку у верхній частині тримача. Надягніть абажур. Поверніть контргайку на місце. Вкрутіть лампочку. Увімкніть у розетку.
Для методу з порожнім кошиком почніть з просвердлювання отвору в дні для шнура та стрижня. Якщо у вашого кошика є кришка, просвердліть у ній відповідний отвір. Зробіть їх досить великими, щоб знизу проходив стрижень, а зверху латунна гільза.
Пропустіть кінець шнура з вилкою через порожній стрижень. Протягніть його, доки він не вийде знизу. Закріпіть патрон на верхній частині стрижня за допомогою гвинтів, що фіксують. Надягніть латунну гільзу на стрижень так, щоб вона щільно прилягала до патрона.
Зауважте слабкий вузол на шнурі у нижній частині стрижня. Це знижує навантаження на дроти. Встановіть стрижень у кошик. Протягніть шнур через отвір у дні. Нанесіть краплю силіконового клею на стрижень унизу всередині кошика. Це зафіксує його дома. Поверніть кришку кошика на місце. Закріпіть стрижень зверху за допомогою додаткового силіконового клею.
Тепер обважніть основу. Використовуйте матеріал, який не прокидатиметься крізь плетіння. Прикріпіть вилку до кінця шнура. Встановіть тримач, абажур та лампочку так само, як і раніше.
Світло вмикається. Роботу виконано. Ви зібрали лампу з підручних матеріалів та деталей із господарського магазину. Вона працює. Вона виглядає продумано.
Іноді найпростіші рішення просто чекають, коли їх зберуть.
Що далі? Лампи з пічної труби – ще один варіант, якщо ви бажаєте індустріальний стиль. Процес схожий, але матеріали змінюються. Метал потребує інших заходів безпеки. Гострі краї – реальна небезпека. Одягайте рукавички. Перевіряйте різьблення. Переконайтеся, що патрон заземлений.
Висвітлення – це функціональне мистецтво. Ви контролюєте джерело. Ви обираєте форму. Для цього не потрібний електрик. Потрібні лише обережні руки та ясний розум.
Створіть стійку основу для саморобної лампи з пічної труби
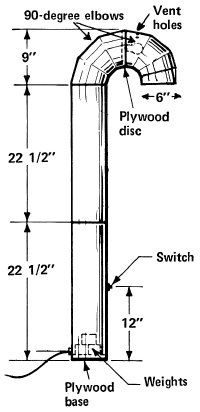
Каркас марний, якщо він перевертається. Лампа з пічної труби за своєю конструкцією має зміщений вгору центр ваги, тому основа повинна мати значну масу. Почніть із фанери завтовшки 3/4 дюйма. Вам знадобляться два диски: один для нижньої частини та один для майбутнього корпусу лампочки. Обведіть на дереві неструмлений кінець прямої ділянки труби і стягнутий край куточка. Двічі відміряйте. Один раз відріжте.
Використовуйте ручну або лобзик. Точно слідуйте по лінії. Якщо диск занадто вільний, він гримітиме. Якщо занадто тугий, ви не зможете його вставити. Зашкурьте краї наждачним папером або напилком з дрібним зубом, поки диск не буде щільно і надійно входити в трубу.
Свердління отворів для вимикача та шнура
Саме тут більшість людей припускаються помилок. Не свердліть навмання. Позначте пряму ділянку труби. Приблизно на висоті 12 дюймів від низу просвердліть отвір для стрижня вимикача лампи. Досить велике. З протилежного боку просвердліть ще один отвір на відстані 1 1/4 дюйма від дна. Це для шнура. Тримайте його невеликим. Щільна посадка означає відсутність звисаючих проводів.
Складання обтяженої основи
Візьміть нижній фанерний диск. Нанесіть смужку будівельного клею по краю зрізу. Вставте його в неструмлений кінець нижньої ділянки труби. Притисніть донизу. Похитайте. Переконайтеся, що він стоїть рівно і врівень з нижнім краєм. Він повинен почуватися щільно зафіксованим.
Тепер стабілізуйте його. Висока лампа. Вона впаде. Додайте вагу. Найкраще підходять цегла або свинцеві вантажі. Орієнтуйтесь приблизно на 5 фунтів. Приклейте їх до внутрішнього боку фанерної основи за допомогою будівельного клею. Спочатку перевірте отвори. Не закривайте отвір вимикача або вхід для шнура. Це помилка, яку не можна виправити пізніше.
Закрийте необроблений край фанери ззовні. Обведіть трубу на щільній повсті. Виріжте коло. Приклейте його до нижньої сторони білим клеєм. Розгладьте. Дайте всьому висохнути. Повністю. Не поспішайте з клеєм.
Як безпечно підключити лампу з пічної труби
Проведення не складне, але воно не прощає помилок. Вам знадобиться 12 футів легкого лампового шнура. Цього достатньо, щоб дійти від основи, вгору формою «цукерки-тростини» і до патрона.
Зачистіть кінці шнура. Підключіть один кінець до вимикача. Інший кінець йде до швидкозатискної вилки. Пропустіть шнур через просвердлений отвір. Він повинен пройти через фанерну основу та в порожню трубу.
Додавання ваги для стійкості
Чому 5 фунтів? Тому що труба завдовжки 54 дюйми — це важіль. Легкий дотик перекине її. Цегла поміщається всередину нижньої секції, лежачи на фанері. Вони низькі. Низький центр важкості. Висока стійкість.
Переконайтеся, що вантаж надійно закріплений. Клей допомагає, але решту робить гравітація. Двічі перевірте, чи нічого не блокує шлях шнура. Якщо шнур притиснутий, ізоляція протреться. Іскриста металева труба – це пожежна небезпека. Не варте того.
Дайте клею затвердіти. Повстяна прокладка захищає вашу підлогу. Вантажі захищають лампу. Вимикач керує світлом. Просто.
Примітка безпеки: Переконайтеся, що всі електричні з’єднання ізольовані, а шнур не затиснутий і не натягнутий надто туго всередині секцій труби.
Підготовка секцій труби до збирання
Перш ніж з’єднувати решту труби, очистіть її. Пічна труба може містити виробничі олії чи пил. Протріть її. Якщо ви плануєте пізніше пофарбувати її в чорний або білий колір, зробіть це зараз. Спочатку нанесіть ґрунтовку для металу. Потім високо сяючий емалевий лак або колір на ваш вибір. Дайте висохнути.
У вас є дві прямі ділянки довжиною 24 дюйми і два куточки під 90 градусів. Для форми «цукерки-тростини» ви складатимете їх: Прямий, Кутник, Прямий, Кутник. Верхній куточок тримає патрон для лампочки. Нижня пряма ділянка – це ваша основа.
Тримайте шлях проведення вільним. Коли ви збиратимете деталі пізніше, шнур повинен проходити через центр без перегинів. Пропускайте його в міру з’єднання секцій. Не використовуйте силу. Якщо він не ковзає, перевірте наявність задирок усередині стягнутих з’єднань. Зашкурьте їх до гладкості.
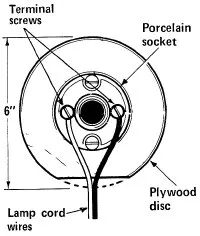
Діаметр лампи становитиме 6 дюймів. Це широко. Це міцно. Це сміливо. Але тільки якщо основа тримається. Перевірте вантажі ще раз. Легко похитайте основу. Якщо воно хитається, додайте більше клею або відрегулюйте цеглу.
Як тільки основа стане міцною і сухою, ви готові створювати форму. Наступний крок – з’єднання кутових з’єднань. Переконайтеся, що шнура достатньо, щоб досягти верхнього патрона, перш ніж ви запечатаєте останнє з’єднання. Додати довжину пізніше ви не зможете.
Як зібрати та підключити лампову конструкцію
Ви вже готові секції труби. Тепер потрібно зробити так, щоб вони могли утримувати лампочку.
Візьміть другий фанерний диск. Відріжте вузьку смужку по одному краю. Цей проміжок дозволить проводам увійти в корпус лампи, не прокладаючи шлях крізь суцільне дерево. Міцно прикрутіть порцеляновий патрон до центру диска. Не заощаджуйте на надійності кріплення.
Нанесіть бead будівельного клею на зрізаний край диска. Пропустіть відрізану частину. Вона має залишитися відкритою. Притисніть диск до зім’ятого кінця однієї із секцій куточка. Сторона з патроном має дивитися назовні. Переконайтеся, що диск стоїть рівно. Пізніше лампочка виступатиме у другу секцію куточка.
Дайте клею висохнути. Виконайте час, вказаний виробником. Терпіння – частина витрат тут.
Вибір правильної інтер’єрної фарби для якості світла
Спочатку пофарбуйте внутрішній бік кінця, де буде лампочка. Це змінить сприйняття лампи.
Хочете сфокусований промінь для читання? Використовуйте матову чорну фарбу у спреї. Вона поглинає світло та спрямовує його вниз. Бажаєте м’яке, розсіяне свічення? Виберіть білу матову фарбу. Вона відбиває світло всередині корпусу.
Надягніть другу секцію куточка на першу. Складання з патроном має знаходитися приблизно посередині між цими двома вигнутими трубами. Налаштуйте кут. Щільно притисніть їх один до одного.
Розкладіть газету на робочій поверхні. Закрийте отвір патрона малярським скотчем. Вам не потрібно, щоб фарба потрапила на контакти.
Пофарбуйте внутрішню частину всієї вигнутої збирання. Покрийте фанерний диск. Покрийте внутрішні стінки труби. Дайте повністю висохнути. Якщо ви бачите незакриті місця, пофарбуйте знову. Дайте висохнути.
Свердління вентиляційних отворів для безпеки
Коли фарба повністю висохне, зніміть малярський скотч із патрона.
Вкрутіть лампочку. Усього на мить. Зауважте, де знаходиться скло всередині зігнутої труби. Негайно вийміть лампочку.
Вам потрібно відводити тепло. Лампи розжарювання сильно нагріваються. Затримане тепло становить ризик загоряння.
Поверх вигнутої труби, прямо над місцем, де знаходиться лампочка, просвердліть три отвори. Використовуйте свердло діаметром 3/8 дюймів. Три отвори достатньо для розсіювання тепла.
Підключення вимикача та основи
Пропустіть 12-футовий (близько 3,6 м) відрізок легкого лампового шнура через отвір, який просвердлили в нижній прямій секції труби. Відразу над фанерною основою.
Залишіть близько 8-9 футів (2,4-2,7 м) шнура зовні труби. Зауважте слабкий вузол усередині отвору. Це зафіксує шнур, щоб він не висмикувався, коли ви тягнете за зовнішню частину. 3-4 фути (0,9-1,2 м), що залишилися, всередині лампи будуть використані для підключення.
Проведіть провід вгору основним шматком труби. Направте його до отвору вимикача.
Розділіть два ізольованих дроти шнура на кілька дюймів біля отвору для вимикача. Переріжте один з проводів. Чи не обидва.
Використовуйте стрипер для дротів, щоб зняти близько 1/2 дюйма ізоляції з двох відрізаних кінців цього дроту. Підключіть ці оголені кінці до двох гвинтових клем на вимикачі лампи.
Вставте вимикач у отвір у трубі. Закріпіть його за допомогою фіксуючого кільця, що додається.
Завершення складання
Встановіть інший прямий шматок труби на основу. Незім’ятим кінцем униз. Щільно натисніть, щоб з’єднати їх.
Протягніть вільний кінець дроту вгору через трубу.
Розділіть два ізольованих дроти на вільному кінці. Приблизно на 6 дюймів.
Встановіть зібрану вигнуту частину у формі «солодкої тростини» на пряму основу. Протягніть розділені кінці шнура до фанерного диска. Через вирізану область, яку ви зробили раніше.
Зніміть близько 1/2 дюйма ізоляції з кожного кінця дроту. Підключіть їх до гвинтових клем порцелянового патрона.
Надягніть вигнуту частину на пряму частину. Щільно. Отвір для світла та вимикач мають бути з одного боку.
Прикріпіть швидкозатискну вилку до вільного кінця лампового шнура. Дотримуйтесь інструкцій виробника.
Фарбування зовнішнього покриття
Закрийте робочу поверхню. Закрийте ламповий шнур. Закрийте вимикач. Заклейте отвір лампочки. Заклейте вентиляційні отвори у верхній трубі.
Нанесіть легкий шар ґрунтовки для металу. Дайте повністю висохнути.
Нанесіть два або три шари високоглянцевої емалі у спреї. Дотримуйтесь інструкцій на банку. Вам потрібна гладка поверхня.
Дайте фарбі повністю висохнути.
Зніміть весь скотч та папір. Вкрутіть лампочку потужністю 40, 75 або 100 Вт.
Лампа готова.
Якщо у вас вже є лампа, яка вам подобається, але ви ненавидите абажур, пропустіть збирання. Перейдіть на наступну сторінку за інструкціями щодо виготовлення нового абажура.
Пов’язані посібники з освітлення
- Як виконувати домашні електромонтажні роботи : Світло згасло? Вимикачі застрягли? Дізнайтеся прості способи усунення найпоширеніших побутових електричних проблем.
- Як працюють лампочки : Крім простого свічення, що відбувається всередині скла? Зрозумійте механіку освітлення.
- Як працює електрика : Від тостерів до вуличних ліхтарів дізнайтеся, як енергія проходить через ваш будинок.
Як зробити чохол-обкладинку для абажура зі складаннями
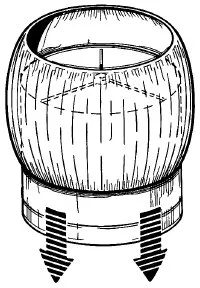
Вам не потрібно викидати нудний чи зношений абажур. Просто накрийте його. Ця техніка створення чохла для абажура зі збірками перетворює простий предмет на елегантний приблизно за годину. Виберіть будь-яку легку тканину, яка добре драпірується. Мета – м’які складки, а не жорстка структура.
Спочатку зніміть із абажура все зайве. Якщо є бахрома, кисті або інші прикраси, обережно зніміть їх. Дійте дбайливо: ви хочете зберегти цілісність внутрішньої конструкції.
Викроювання тканини для ідеальної посадки
Виміряйте висоту абажура. Додайте до цього три дюйми. Виріжте дві смужки тканини такої довжини, розрізаючи поперек ширини рулону.
Для абажура висотою 12 дюймів потрібні дві смужки завдовжки 15 дюймів.
Складіть ці дві смужки разом по краю, поєднуючи лицьові сторони. Зшийте їх із припуском на шов у півдюйми. Видаліть шпильки. Розправте тканину. Тепер у вас є одна довга безперервна смуга тканини.
Далі виміряйте коло нижньої частини абажура. Помножте це число на півтора. Це довжина, яка потрібна для вашої смужки тканини.
Якщо нижня частина має коло 50 дюймів, відріжте 75 дюймів тканини. Це забезпечить достатню повноту для збирання. Якщо ваша тканина дуже тонка, можливо варто додати трохи більше. Обріжте смужку до потрібної довжини, зрізаючи з обох кінців, щоб шов залишався по центру.
Шиття канавок для гумки
Складіть цю довгу смужку навпіл по шву. Лицьові сторони разом. Зшийте два вільні кінці з припуском на шов у півдюйма. Тепер у вас є зашморг.
Загніть усередину півдюйма вздовж обох довгих необроблених країв. Загніть ще на півдюйми. Ви створюєте канавку для гумки. Приколіть шпильками. Прострочіть всю петлю по колу.
Зупиніться. Залиште зазор в один дюйм у рядку на кожному краї підгину. Саме так ви вставлятимете гумку. Зробіть закріплення на початку та в кінці шва, щоб утримати його.
Вставка еластичного шнура
Відріжте шматок круглої гумки середньої щільності. Зробіть його точно такої довжини, як коло нижньої частини абажура.
Прив’яжіть один кінець гумки до шило-вдягальні або великої шпильки з безпечним кінцем. Введіть шпильку в однодюймовий отвір нижнього підгину. Проштовхуйте її всередині канавки. Тягніть тканину за собою. Збирайте її.
Коли шпилька вийде з іншого боку, зв’яжіть два кінці гумки квадратним вузлом. Заправте вузол назад усередину.
Повторіть те саме для верхньої частини. Відріжте гумку по довжині кола верхньої частини абажура. Вставте її у верхній підгин таким же чином. Зв’яжіть. Заправте.
Установка на лампу
Зніміть абажур із лампи. Надягніть тканинний чохол на нього. Розгладьте. Гумка повинна рівномірно зібрати тканину.
Занадто вільно? Затягніть вузли гумки щільніше. Дуже туго? Послабте їх. Регулюйте, доки результат не стане ідеальним.
Часті питання
Чи можна використовувати світлодіодні лампи з цим саморобним абажуром?
Так. Світлодіоди нагріваються менше, що безпечніше для тканинних чохлів. Просто переконайтеся, що цоколь підходить до патрона.
Як змінити форму чи висоту?
За допомогою цього чохла ви не можете легко змінити форму самого абажура. Тканина драпірується за наявною формою. Якщо ви хочете іншу форму, вам потрібен інший базовий абажур.
Які тканини найкраще підходять для абажурів зі складаннями?
Обмежтеся легкими матеріалами. Бавовняний вуаль, льон або тонка синтетична тканина. Вони м’яко складаються. Уникайте щільного деніму чи товстого полотна. Вони не будуть гарно збиратися.
Чи потрібна мені швейна машина?
Так. Ручне шиття канавки для гумки – стомлюючий процес, схильний до нерівномірного натягу. Машина робить підгинання та замикання петлі набагато швидше.
Примітка щодо безпеки: Відключайте лампу від мережі під час роботи з нею. Електрика та тканина погано поєднуються, якщо ви відволікаєтесь.