

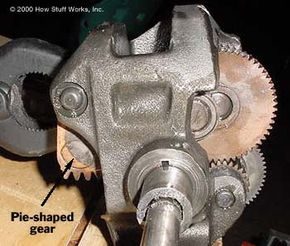
The washing machine gearbox is basically the brain behind the brawn. It sits inside the outer tub, tucked away from view but doing all the heavy lifting. If you pull the pulley on the gearbox one way, the inner shaft turns slowly back and forth. It reverses direction about every half-revolution. That is the agitate cycle. The clothes slosh. The dirt lifts.
Spin the pulley the other way, and everything changes. The flange engages high speed. The whole tub spins. Clothes press against the drum walls. Water flies out. This simple mechanical switch is what makes the appliance useful. Without it, you just have a wet bucket.
Why Your Washer Makes Grinding Noises
Sometimes the gearbox fails. You hear a grinding noise. Or maybe the tub stops turning entirely. These are common signs of internal wear. The gears strip. The shaft breaks. Or the seals leak, flooding the internal components with water and detergent.
Repairing this part requires disassembly. You will need socket sets. Wrenches. Screwdrivers. And a lot of patience. Safety first. Unplug the machine. Shut off the water valves. Drain any remaining water from the hoses. You do not want to slip in a puddle while wrestling a 30-pound metal component.
Replacing the Gearbox: A Step-by-Step Guide
- Disconnect power and water. Always.
- Remove the back panel. Usually held by a few screws.
- Disconnect the drive belt. It loops around the motor pulley and the gearbox pulley. Loosen the motor mount to slip it off.
- Unbolt the gearbox. It is typically held by three or four bolts to the outer tub.
- Lift it out. It is heavy. Use a helper if you can.
- Install the new unit. Reverse the steps. Ensure the belt is aligned. Tighten all bolts securely.
What Tools Do You Actually Need?
You do not need a full mechanic’s kit. Just the basics:
– Socket set. Metric or standard, depending on your machine’s age.
– Wrenches. For the motor mount bolts.
– Screwdrivers. Flathead and Phillips.
– Pliers. To clamp hose clamps or remove clips.
– Work gloves. Sharp edges on the tub are real.
Common Mistakes to Avoid
- Forgetting to disconnect power. You can get shocked. Or worse, start the motor accidentally.
- Over-tightening bolts. Stripped threads are a nightmare. Snug is enough.
- Ignoring the seal. If the new gearbox has a leaking seal, water will escape into the motor. Replace it if unsure.
- Skipping the belt check. If the old belt is cracked or glazed, replace it now. It is cheap insurance.
Is It Worth DIY?
If you are handy, yes. A new gearbox costs $50 to $150. A repairman might charge $300 or more for labor alone. The savings are real. But if you are not comfortable with mechanical work, skip it. One wrong move can damage the outer tub permanently.
The washing machine gearbox is
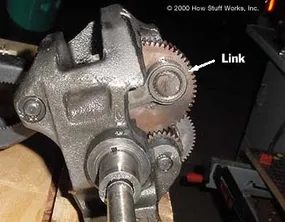
The heart of the mechanism starts with a basic gear and link combination. Think of the link attached to the gear like the connecting rod on an old steam train wheel. As that main gear turns, the link pushes against a pie-shaped gear back and forth. This reciprocating motion is the first step in converting motor power into usable movement.
Converting Motion Through Spline Engagement
That pie-shaped gear doesn’t just spin freely. It engages a small gear located on the inner shaft. This connection leads directly to the spline, which is the critical interface for transferring torque. The spline receives power in alternating directions, allowing the drum to switch between washing and spinning modes.
Why Gear Reduction Is Necessary for Wash Cycles
You might wonder why the system needs extra gears just to turn slowly. The answer lies in the motor itself. Most washing machine motors are designed to spin at a single, high speed—the spin cycle speed. They are not built to run at the slow, heavy-duty RPMs required for a gentle wash.
To fix this mismatch, the system uses additional gears for reduction. These gears act as a slowdown switch. They take the motor’s rapid rotation and reduce it significantly. This allows the drum to tumble clothes gently during the wash cycle without stripping the motor or burning out the belts.
The motor spins only at one speed: spin-cycle speed. A gear reduction is necessary to facilitate the slower wash cycle.
Without this reduction, you’d either have no wash cycle or a motor that overheats every time you start a load. The trade-off is complexity, but the result is a machine that can handle both high-speed drying and low-speed cleaning.
Tools and Materials for Maintenance
If you’re looking at this system because your washer is making noise or failing to switch modes, you’re likely dealing with gear wear or spline damage. Here’s what you’ll need to inspect or replace parts:
- Socket set: For removing the outer casing and accessing the drive assembly.
- Screwdrivers: Phillips and flathead for disconnecting wiring harnesses and covers.
- Replacement gears: Specifically the pie-shaped gear and the small inner gear if they show signs of stripped teeth.
- Spline coupler: Check for cracks or wear where it connects to the inner shaft.
- Lubricant: High-temperature grease for reassembling the gear train.
Safety first. Unplug the machine before opening any panels. The motor is under tension, and sudden releases can cause injury. Also, be careful with the electrical connections near the motor housing.
Which Parts Fail Most Often?
The pie-shaped gear takes a beating. It’s constantly being pushed back and forth by the link. Over time, the teeth can wear down or snap off. If you hear a grinding noise during the wash cycle, that’s usually where the problem starts.
The spline is another weak point. It transfers the alternating torque from the small gear to the rest of the transmission. If the spline wears out, the drum won’t turn during the wash cycle, even if the motor is running fine. You might see the drum spin during the spin cycle but remain stationary during the wash.
Inspect these components first. They’re accessible once you remove the transmission cover. If the gears look shiny or rounded, they’re worn. Replace them before they
The Agitator vs. Spin Lock Mechanism
So the washer decides to spin. The entire transmission assembly freezes. Everything rotates at the motor’s speed. No agitation. Just high-speed spinning.
Here is the weird part. The gearbox handles two distinct directions. One way, the agitator moves. The other way? The whole machine locks up.
How does a single motor cause such different outcomes?
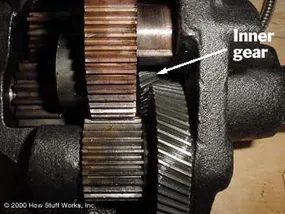
Look at the gears. Specifically, notice the angled teeth on the main gear. There is another smaller gear with angled teeth hiding just behind it in the foreground. These are the only two gears in the entire mechanism with that helical cut.
The angle isn’t just for smoothness. It’s a directional switch.
As the gears spin, the tooth angle forces the inner gear to slide. Physically slide.
If the motor spins one way, the friction and geometry push the inner gear to the left.
That leftward slide engages a locking mechanism inside the housing. The gears can’t turn independently anymore. They become one solid block.
“Depending on which way the gears are spinning, the angle on the teeth will tend to force the inner gear to slide either to the left or to the right inside the gearbox.”
That left slide is the kill switch for the agitator. It disengages the agitate function and engages the spin function.
If the motor reverses, the inner gear slides right. The lock disengages. The agitator gets power.
It’s a mechanical logic gate. No electronics. Just steel, angles, and sliding blocks.
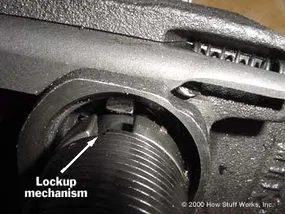
Look closely at the outer shaft. There is a small notch you might miss if you aren’t paying attention. It is hollow inside. This notch connects directly to the shaft via a tiny helical gear.
When that small gear spins, it drags the outer shaft with it. Here is the key part: the small notch grabs onto a single tooth fixed in place within the lockup mechanism.
Why the Gearbox Lockup Matters
This setup isn’t just cosmetic. It changes how your washer works.
When the gearbox is locked, everything moves together. The inner shaft drives the agitator. The outer shaft drives the tub. Both spin at the exact same speed as the input pulley.
Without this lockup, your agitator and tub would move at different speeds. That is how you get a proper wash cycle.
If this notch is worn or the tooth is broken, the lockup fails. Your clothes won’t get clean. You need to check these parts before assuming the whole unit is dead.
How to Inspect the Notch and Tooth
- Remove the cabinet to access the gearbox.
- Locate the outer shaft. Find the small helical gear.
- Check the notch. Is it hollow? Is it stripped?
- Inspect the fixed tooth. Look for wear or breaks.
Use a flashlight. The light helps reveal cracks you might otherwise miss.
Tools You Need
- Screwdriver set
- Socket wrench
- Flashlight
- Replacement gear if the notch is damaged
Safety first. Unplug the washer. Water and electricity don’t mix.
When to Replace Parts
If the notch is stripped, replace it. If the tooth is broken, you need a new lockup mechanism.
You can sometimes buy just the gear. Other times, you need the whole assembly. Check your model number.
This is a small part. But it controls the whole wash cycle.
Don’t ignore it.
The next step is reassembling the gearbox. Make sure everything clicks into place.
One loose bolt can cause a rattle. Or worse, a breakdown.
Check the alignment. Spin the shaft by hand. It should move smoothly.
If it grinds, something is wrong.
Back to the drawing board.
It is satisfying when it finally works. The spin is steady. The wash is strong.
But if you skip this step? You will be calling a repairman.
Or buying a new washer.
Which do you prefer?
The notch is small. The consequence is big.
Handle it with care.
Use the right tools.
Keep your hands clean.
The rest of the process is just following the steps.
One by one.
Until the lid closes.
And the water starts.
That is when you know you did it right.